Quick Camping Beef Stew

An umami-rich beef stew, ready in about 30 minutes.

  • 3 russet potatoes, diced
  • 4 large carrots, sliced
  • 1/2 large yellow onion, diced
  • 1 C portobello mushroom, diced
  • 1 1/4 lb ground beef 85% lean
  • 2 C chicken stock
  • 1/4 C soy sauce
  • 1/3 C tomato paste
  • 2 tsp anchovy paste
  • Salt

You can prep the vegetables ahead of time, packing them lightly in salt to help keep them preserved.

Sear ground beef on high heat in dutch oven. (Optional, to cut time: In a separate pot, combine potato and chicken stock and bring to a boil).

Add tomato paste, anchovy paste and soy sauce to beef, mix thoroughly. Add all vegetables and chicken stock to beef. Bring to a boil then reduce heat to a simmer and cover. After 20 minutes the potatoes and carrots should be soft. Add salt to taste.

Spaghetti with Veal and Bacon

For the last year I’ve been subjecting my family to spaghetti sauce experiments just about every weekend. It’s been an interesting challenge striking a balance between something that is rich enough to be paired with a robust wine, simple enough that my kids will eat it, and quick enough to make that it doesn’t take me all afternoon (or day).

Through this process I’ve come to believe a few ingredients are essential:

  • Caramelized yellow onions add a richness, authentic sweetness and texture that you can’t leave out.
  • Two strips of bacon, finely chopped, added towards the end of the onions caramelizing, takes the sauce to a whole other dimension. You only need two. Three is too many, and one is not enough for you to pick up on it. Pancetta also works here, but it imparts different flavors based on the spices used during curing. I’ve tried a whole bunch and there is one “applewood smoked” bacon at one grocery store in our area that I think works the best. This bacon really is the secret ingredient.
  • Veal, finely ground, has the perfect texture and flavor for spaghetti sauce but not so much texture to overwhelm you. I typically use a 1/2 lb.
  • Anchovy paste. 1-2 tsp. Absolute must have. I can’t make spaghetti without this now. Once you pick up on the little umami boost anchovy imparts you can’t go without it. I’ve tried replicating it with other ingredients but it just doesn’t work. You need anchovy paste.
  • Thoroughly salt the water for the spaghetti, and carefully watch the timer so you can stop it al dente. The salt is critical to get the spaghetti to the proper firmness and bring out the flavor. Opinions vary on how much salt to add (and it depends on the noodle); for the noodles we’ve been buying about 2-3 tsp table salt works for 500g noodles.
  • Fresh basil, thinly sliced, sprinkled on top before serving.

I’ve also concluded there are a few classic ingredients you can do without:

  • Celery and carrot aren’t worth it. Although these are classic bolognese ingredients, they are so fibrous you’ll need to cook them down for an additional 2-3 hours. The flavor gain is pretty minimal, and in that time you’ll have over-boiled and cooked down your other ingredients! I’ve found I prefer a sauce that has pockets of texture and flavor rather than one consistent flavor.
  • Extra meat. Again, a classic bolognese will have more ground beef or ground pork, but I’ve found you really don’t need to add it. It makes for a heartier plate but it distracts from other flavors. Sometimes I’ll add another 1/2-1 lb of ground beef or ground pork but it’s really not necessary.
  • Parmesan cheese (Parmigiano-Reggiano). I feel crazy writing this down but if you nail the sauce you will completely forget about sprinkling cheese on top. And if you do, you’ll regret it because it will mask the flavors of the sauce and just taste like you sprinkled salt on top.
  • Fresh tomatoes or tomato paste. Unless you have 3-4 lbs of fresh ripe tomatoes, a quizinart, 7-8 hours and a desire to clean splattered tomato off your backsplash, it’s much easier to use pre-made tomato sauce and canned tomatoes. The results will also be much more consistent. You can substitute a jar of marinara sauce but there’s only one brand I’ve found that I like; most are pretty bland.
  • Fresh garlic. I’m almost ashamed to admit it, but the sauce doesn’t need fresh garlic. Even a minute amount of fresh garlic will impart a biting zing to the sauce that overwhelms all the other spices. Fresh garlic only makes sense if you’re going to cook the sauce down for 3+ hours. If you like garlic (I love garlic) save it for the crostini on the side. Use only a small amount of garlic powder for the sauce.

Here are the rough steps I follow:

  1. Dice a large yellow onion and sauté over high heat with 2-3 tbsp olive oil, 1 tsp salt. When the onion starts to darken, but before it starts to burn, turn the heat to low, cover, and let simmer for 30-45 minutes. It should slowly turn dark brown and translucent.
  2. About 15-20 minutes into the caramelization you can throw the chopped bacon in with it. If you time it right you’ll have caramelized onions mixed with crispy bacon–you can just stop here. You have won the day.
  3. Add the other meat (veal, pork, beef), turn the heat up to medium and cook it until right before it starts to brown.
  4. Add 1-2 tsp anchovy paste and spices (I’m partial to thyme, coriander, oregano, fennel, garlic powder and red pepper flakes), mix in thoroughly.
  5. Add either 2 cans tomato sauce and 1 can diced tomatoes OR 1 jar of a pre-made marinara sauce.
  6. Simmer for 10+ minutes. Usually by this time the water for the noodles is boiling so I throw the noodles in, wait for them to cook and then serve.
  7. Serve with thinly sliced fresh basil on top.

This becomes an incredible dish if you serve it with crostini, a hot Italian sausage link cooked to 160°F, and a fine red wine.

Restoring nVidia 3D Vision on Windows 10

nVidia ended support for the 3D Vision system on April 11, 2019. I didn’t learn this until I updated to a newer driver today, which then sent me on a long journey trying to figure out how to install a driver newer than I had before but old enough to still have 3D Vision support.

According to the release notes of recent nVidia drivers, “those looking to utilize 3D Vision can remain on a Release 418 driver,” but the 418 driver is not available through nVidia’s driver search tool.

You can still obtain version 418 from guru3d.com, along with a tool you may need to wipe any newer versions of the driver from your system:

Windows 10 may automatically update the driver next time it checks for updates. To prevent it from doing this use the “show or hide update” troubleshooter:

Oatmeal banana pancakes

Out of flour? Want gluten-free pancakes? Want to change things up? A few simple modifications to a banana bread recipe will get you wheat-free pancakes.

In a blender, combine:

  • 3 eggs
  • 1/2 cup water
  • 2 bananas
  • 3 tsp baking powder
  • 1 tsp baking soda
  • 114g melted butter OR 100g olive oil
  • 100g sugar OR 100g honey
  • 1 tsp vanilla extract

Once this is thoroughly blended, add (a little bit at a time) 260g oats and continue to blend until oats are completely pulverized in the liquid. It will take a few minutes.

Bread machine baguette

Baguettes are a wonderful thing, but making a proper baguette requires multiple touch-points over an extended length of time. It’s not difficult by any means, just time intensive.

Since I own a bread machine I thought there must be a way to automate the dough. However the Internet does not appear to have (yet!) any recipes for that:

  • Have sufficient rise time. In order to develop the yeast for a baguette you need to let the dough work for a minimum of 9 hours.
  • Utilize a poolish. This is key to developing the yeast.
  • Bake at the right temperature. This type of bread needs to be baked at 470°F, which you can’t do in a bread maker, so you need to remove the dough before the bake cycle and finish it in the oven.
  • Use the right ingredients. A baguette is made from only flour, water, salt (2% by weight), and yeast (only a pinch).

I set our to change this. After some experimentation I discovered a very quick and easy way to make an excellent baguette at home with very little effort utilizing a Zojirushi BB-PAC20BA in “HOME MADE” mode. The first “trick” is to assemble the dry ingredients on the bottom of the bread maker (the opposite of what you would normally do).

Place in the bread maker, in this order:

  • A pinch of yeast on one side
  • 1 tsp (10g) salt on the opposite side
  • 300g bread flour*

Mix a poolish by combining:

  • A pinch of yeast
  • 1 and 1/4 cup water
  • 180g bread flour*

Carefully pour the poolish over the dry ingredients, being careful to not to mix them.

Program the bread machine (on my Zojirushi this is done in “HOME MADE” mode):

  • 0 minutes rest
  • 20 minutes knead
  • 60 minutes rise 1
  • 60 minutes rise 2
  • 60 minutes rise 3
  • 0 minutes bake
  • 0 minutes keep warm

The second “trick” is to execute this custom program on a timer. Set the bread machine to finish in 9 hours*. This will allow the poolish to develop for 6 hours, and the dough to rise over another 3 hours. Go to sleep, or get on with your day!

When the cycle is complete, pull the dough out onto a floured surface, divide in half and roll into two loaves. Bake at 470°F for about 10-12 minutes. For a crispy, crackly exterior, throw about a half cup of water into the bottom of the oven in the final minutes–the steam will crisp up bread.

*I’ve tried this recipe with several flours, and I prefer it with Gold Medal Bread Flour. For King Arthur Bread Flour (which has higher protein content ) increase the water to 1 3/8 cups and allow at least 11 hours total time.

Three things I’ve come to believe about post modern C++

In no particular order:

  • Template metaprogramming is still evil, and C++11/14 hasn’t fixed anything about it. People argue metaprogramming enables “clean, elegant code,” as if a home built on a garbage dump won’t smell like garbage. If anyone else needs to repair or extend the foundation of your home they’ll need to parse through your garbage pile to make changes. Template metaprogramming as a rule should simply never be done outside low-level libraries.
  • auto is too easy to abuse. Oh but, “the IDE makes auto easier to read!” Go back to Java. auto does have a few good uses, clang-tidy provides excellent guidance on where its effective, its guidance should be followed.
  • Large lambdas harm readability. They make the control flow of the program harder to parse and discourage self documenting code. Lambdas should be limited to 2-3 statements. And please, if you write a lambda, mean it: don’t write a lambda where you could have just as easily written a standalone function.

The simplest BBQ brisket recipe on the Internet

I recently got a new BBQ smoker, after a 10+ year hiatus from BBQ. Temperature controlled, pellet fed.

I had to try a brisket first. But since I was rusty at smoking meats, I read a few articles online about making the “ultimate brisket” and was a little surprised by what I found. In summary, there are a lot of recipes out there that will keep you busy by your smoker rubbing, basting, spraying, turning and poking for 16+ hours. It sounded like a lot of work, and much of it sounded unnecessary.
Humans have been smoking meat for thousands of years. The recipe has always been salt+smoke. How hard can this be? After a few texts and calls to a good friend and avid barbecuer, I decided to try something simpler. Much simpler. For science.
The results turned out great. Not <your favorite BBQ joint> great, but pretty darn great given I put basically zero effort into this.
BBQ people of the Internet, I present the world’s simplest BBQ brisket recipe.
  1. Pat dry your brisket.
  2. Trim some fat off, but leave at least 1/4″ fat where you can. The fat makes a good moisture insulator. Or don’t. A dry crust tastes great too! For this experiment I trimmed the fat off one half of mine and left the fat on the other half; I liked both!
  3. Make a dry rub of 2 parts rock salt to about 1 part ground black pepper. Eyeball it. Rub it into the meat and let the brisket sit out for an hour.
  4. Set your smoker to 150°F and wait for it to stabilize at 150.
  5. Place the brisket in the smoker and cook for at least 1 hour per pound.
  6. DO NOT OPEN YOUR SMOKER. “If you’re looking, you’re not cooking.” Go look at something else: Look up at the sky, your significant other, whatever. There’s plenty of interesting things to look at. Don’t risk fiddling with the internal temp of your smoker.
  7. Shut the smoker off, wrap in foil and let rest for 60+ minutes before serving.
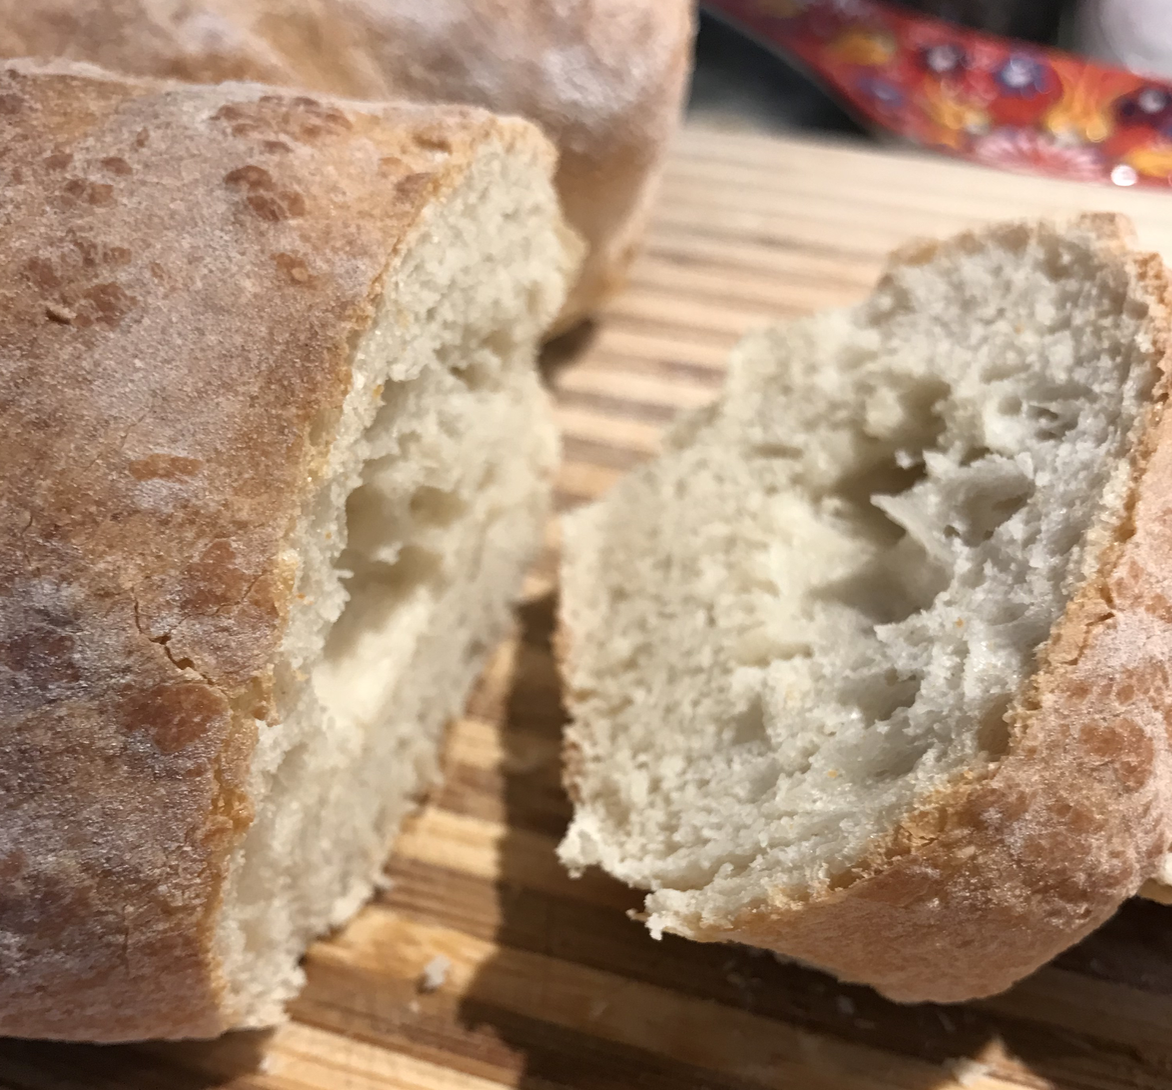
That’s it! Brisket, salt, pepper, smoke.. This is not complicated. My brisket came out with a perfect bark, a 3/8″ smoke ring and was oozing liquid when I cut into it. Tasted amazing. I noted that the internal temp of the fat side was 154°F, so my smoker–even though it was set to 150–was overshooting a little.
If you want the “ultimate brisket” keep scouring the Internet, but you should try this first 🙂
Update (a few weeks later): I’ve cooked about 4 more briskets since writing this and have learned a bit more about how to achieve the “ultimate brisket”. 160°F is the temperature at which the connective tissue collagen begins to break down (Link). If you want falls-apart-under-a-plastic-fork-tender brisket, you need to get the brisket above this temperature. The problem is this higher temp also comes with higher moisture loss.

The solution is a trick called the “Texas Crutch”: after slow-smoking the brisket at 150°F for 10+ hours, tightly wrap it in foil and then throw it in the oven at 175°F and let it go for another 6+ hours. You’ll lose the crispy bark but the trade is a super-moist melt-in-your-mouth brisket.

This isn’t quite as simple as I initially advertised but it’s worth the effort. I’ve been doing this as an 16 hour recipe: Start smoking at 8PM, at 8AM wrap it in foil and stick it in the oven and you’ve got great BBQ for lunch. The same technique works great with chicken legs. For pork butt, instead of wrapping in foil, stick it in a dutch oven and it’s ready to pull right away!

Ultimate omelet

MASTERS OF BREAKFAST: Episode 1

The trick to the perfect omelet is to borrow a technique from frittatas: broil the omelet under high heat before you flip it. Broiling causes the egg to rapidly expand, yielding a fluffier, moister omelet. And it has the added benefit of decreasing the overall cook time.
Since we’re placing the omelet pan in an oven under a 500°F broiler, you’ll want to use a carbon steel or cast iron pan for this recipe. A 9″ pan with a 45° edge is ideal if you plan to flip the omelet like a pro.
  1. Pre-heat your broiler to 500°F.
  2. Pre-heat your omelet pan to about 275°F (medium).
  3. Sauté your diced veggies (onion, bell pepper, etc.) in a little oil until desired texture. (If you’re making a batch of omelets you may want to do this ahead of time).
  4. Add your meats (bacon, ham, sausage, etc.) and sauté for another minute. Shake pan to make sure nothing is sticking–if its sticking add a little more oil.
  5. Whip 2 eggs with a splash of water until frothy and pour over sautéd meats and veggies.
  6. Cook for one minute on stove (should be bubbling very slowly).
  7. Move pan to oven and place under broiler for 1-2 minutes.
  8. Watch omelet carefully, remove from oven when sides begin to curl up and top is a very light golden brown.
  9. Flip omelet over and place pan back on hob.
  10. Add shredded cheese to one side of omelet and fold omelet over. Cook for another 30 seconds.
  11. Flip folded omelet again and place back on hob for another 30 seconds.
  12. Serve.
IMG_0068.JPG

Creating lesson files for Yamaha YPG-235

I recently picked up a YPG-235 off Craigslist. One of the reasons I sought it out was for the “lesson mode” (or “Yamaha Education Suite”) where it helps you learn songs by displaying the notes and pausing the song for you until you hit the notes. You can do the same with a PC/iPad now, but I was hoping for a more offline experience. Sadly, the process to get new songs onto the keyboard is less-than-straightforward.. As I was unable to find a tutorial online on how to do this, here are the basic steps for you, Internet.

You’ll need a PC running Windows, as Yamaha’s music transfer software only runs on Windows. Install the USB MIDI driver for your keyboard and verify you can transfer midi files to it using their “Musicsoft Downloader” program.
Regular midi files will play on Yamaha keyboards, but they won’t work in lesson mode. The trick for getting files to play in lesson mode is to put the music you want to play yourself on Track 0 with the right hand on Channel 0 and the left hand on Channel 1. The file must also be in MIDI Type 0 file format.
Some free software for Windows that can help you out with a conversion: try MidiEditor to rearrange the tracks/channels and GN1:0 to convert MIDI Type 1 format files into MIDI Type 0.
Once you have the file in the right format you should be able to transfer it to the keyboard, reboot and it will appear in the song list and be playable in lesson mode. If you’re looking for free midi files try midiworld.com or hymnary.org. Good luck!